Timing
Now that we've established the basic concepts of what the spline editor shows us, how do we apply those to our animation in a useful way? What do traditional animation timing concepts such as "ease-in" and "ease-out" look like in the spline editor?
Let's talk about timing as it applies to splines. Anytime an object or character moves from one pose to another, you have to decide how to time this action. How does it move out of Pose A? Does it ease-out or fast-out? Is there an anticipation in the opposite direction? Likewise, how does it arrive in Pose B? Does it ease-in or fast-in? Is there an overshoot and settle? Which pose do you want to favor, A or B? You should ask yourself these questions anytime something moves in your scene. Otherwise the computer will decide for you, and the computer rarely makes interesting choices. When I am blocking my animation I always start with flat-tangent splines on all of my keys, but I rarely leave them that way in the final animation.

As you can see in the above clip, if I leave the keys for poses A and B with the same generic flat tangents (or with linear keys) then the timing of the action will be even and boring. There is only a subtle acceleration and deceleration, which does not feel natural. Note the evenness of the spacing, indicated by the red dots. This kind of timing is usually only useful for a mechanical actions, but even for these you can probably find more interesting timing solutions.
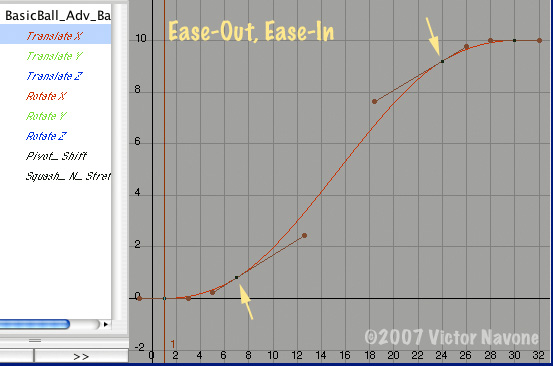
Ease-In's and Ease-Out's: These are the most common are very easy to achieve right in the spline editor. As I pointed out before, each of my poses has a copied pair of keys to make them hold in place. But if I were to slightly raise the second key or lower the third key, I would get an ease-out or ease-in, respectively. Let's focus on the ease-in to Pose B first. I select the 3rd key and lower it a little, then tilt its tangent handle so that the spline flows smoothly through it. Now instead of stopping and holding at Pose B, it gets almost all the way to Pose B and then eases in. This adds some cushion to the end of the action and gives the ball a more natural deceleration and a sense of weight.

Notice in the clip above that there are more dots gathered towards Pose B. In other words, the animation now favors Pose B. If I raise and tilt the 2nd key in the same fashion I get an ease-out of Pose A. Now instead of starting from a hold, the ball gradually accelerates into the move.
The amount to move and tilt a key for an ease depends on a lot of things: the distance between the two poses, the weight and size of the object, the intensity of the action, and the style of animation. A good place to start is to move the key so that it's value is between 85% and 95% of the difference between the first and second pose. Then tilt that tangent handle so that the spline stays smooth. Make sure that the curve does not go beyond the second pose, or you will get an overshoot instead of an ease (more about this in the Spline Hygiene section). I could also increase the amount of ease just by lengthening the tangent handles for the 2nd or 3rd key:
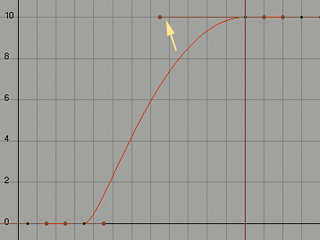
This method is sometimes useful but does not give as much control as using a key to shape the ease.